CLICK HERE FOR FREE BLOGGER TEMPLATES, LINK BUTTONS AND MORE! »

26 June 2012

Father's Day Gifts

So believe it or not I've actually found some time to update my blogs....crazy I know, what with our house currently looking like this:

Yes, boxes everywhere.  Thankfully they are being loaded up right now by the movers, so things are actually happening.  'Unfortunately' we can't help so we just have to sit around the house and wait,...yes it is a little tedious but it gives me a chance to catch up on what we did for Father's Day! 

I'm sure lots of people have done most of these ideas but I thought I would post pictures anyway.  Plus I think they are pretty self explanitory, so here's what we did:


I just loved the idea for this tie!  I get it from another website (sorry I can't remember which one) but I did change it slightly and handstitched the felt hands on and wrote "Daddy's love TIES us all together" on it!


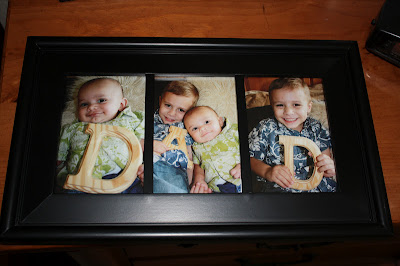
I got the wooden letters from hobby lobby, but you can purchase them from Walmart, Michaels etc...  (Be warned if your kiddos are anything like my boys this cute picture frame WILL take longer than 10 minutes to do.....Disclaimer: I do not take blame for hours of time and hundreds of pictures taken!  But I do promise you will get the right shots in the end! :)


Just because we know daddy loves chocolate we did this cute jar full of Herseys Kisses!


If you have any questions on what I did or how just email me!!! Thanks for reading!!

08 June 2012

A Little Break!

Everyone is in need of a little break now and again and I know that I've only just caught up on my 'things I do' blog but I have good reasons. As some of you may know 11 weeks ago I gave birth to a handsome baby boy and ever since then I've been playing catch up.  He's totally worth it though, don't you think!


Anyway, I am writing because I will be 'out of action' for this blog anyway, for the next few months, as I doubt I will have time for crafting as we are on the move.  Yes, we will be leaving our lovely home in San Antonio, for pasture much more green in beautiful Hawaii. (Are you jealous yet?!) Okay that really wasn't my intent, to make you jealous, but I just wanted my readers (all 4 of you!) to know that I won't be blogging here for a little while.  I have some cute Father's Day things that I will be doing and will try and post them on here before I go, but there are no guarantees.  So have a great summer....and I will post again when we're settled in Hawaii!  Aloha!! :)

Pirate Party

My oldest boy just turned 3 a month ago (yes, I am playing 'catch up', after having a baby things tend to get left for a little!) and asked if I would do him a Pirate Party!  I have to admit I took a lot of my ideas from Fickle Pickle, but had I blast doing it all.  The kiddos seemed to enjoy themselves too.  As I have done loads of writing on here today already I thought that I would just post pictures and the link to Fickle Pickles site: http://befickle.blogspot.com/2011/01/pirate-parrrty.html


Most of my purchases were from Oriental Trading and Party City.  There are so many pirate things out there its actually hard to stop buying!  My one GREAT find was those inflatable pirate swords...I go them for 42c each through a store on amazon!  Talk about a great buy! And they were a hit with the kids too. 

We played a treasure hunt game, where they earned their party favours; pass the canon ball (a spin on the English party game, pass the parcel) and dig for treasure. Most of all the ideas, I took from Fickle Pickle, so I'm not going to repeat them again, just check out her blog....its awesome! :)

Primary Singing Time

Okay, so I am slightly baised but I have to tell everyone that Primary Music Leader, is possibly the BEST calling you could ever have!! I just love teaching all of "my" 140ish children different songs each week.  Sadly my time as their teacher has come to an end, so I thought that I would quickly sure some last few ideas that I did with the children.

Singing Hat

To get the primary children to sing louder (not shouting!) I told them that the class who sang the nicest got to put the funny hat on their teacher.  The crazier the hat the better!!


Teaching the Children how to 'Follow'
I found this idea from another website but I don't remember where, but I loved it so much I had to share it, with my little tweaks.  The problem with having a big primary like ours is that there rarely is a time when every child is watching you, listening and singing when they should, BUT this idea actually achieved all 3!! The idea is to do everything in mime.  This has to be adjusted with junior and senior primary, but it works brilliantly.  I typed everything out that I wanted to say and just used them for the senior primary.  For junior primary I started by telling them that I wasn't going to speak and that they would just have to watch my actions.  At the end I spoke and asked them if it was hard to follow me? I then asked them who else we should follow?  As I was trying to focus on following our Saviour I focused on that, but there are many different things you could use and bear your testimony on.  Here is the link to the words I used: https://docs.google.com/document/d/1OBVE559ib2p3l9PPLSs4TtHb5N6fZ4gd6BD1xx7pdLw/edit


Jenga
This was a fun little game for reviewing songs.  I colour coded my jenga blocks with red, yellow and blue and split the primary children into 2 groups.  I had one person come up and take a block out and stack it on top (like you do with the game!) but with each block there was a question or song to sing. Once they had done the song or answered the questions correctly then they could get a point.  The team that knocks over the jenga blocks loses.  (Although it doesn't always happen, which I have to admit, I prefer! Not that the children always do....!) Anyway, I made red blocks my presentation song reviews (so they had to sing the song all the way through), yellow my question about the songs (for example What do you like to look for whenever there is rain? Answer: A Rainbow) and blue was recite an Article of Faith.  It was a fun little game and could easily be played if you have a fifth Sunday and need to fill 40 minutes!


Treasure Chest

I never got to use this idea, but I thought I would share it anyway.  You will need a treasure chest with goodies locked in it.  A pad lock and 6-10 similar keys.  Attach a song onto each key and have a child come up, pick a key and try to open the lock to the 'treasure'.  Despite whether they get the treasure sing the song written on the key.


Magic Potion
You need clear plastic cups and fill some of them with water and just a couple with vinegar. Then, next to each cup is a plastic spoon with "magic potion" (couple drops of food colouring with a spoon full of baking soda on top, except the spoons next to the vinegar have no food coloring). Then the children get to choose a cup and place the spoon in the liquid and stir. The cups with water will turn the colour of the food colouring under the baking soda. Then you sing the song that is written with the corresponding colour. The cups with vinegar will bubble and over flow (so this should be done on a cookie sheet with a lip) and the children get to choose a favourite song to sing. Simple but very fun!

I don't know that I can think of any more that I did....but if they come to me I will post them!

Handbag

So I wanted to make something 'original' for my mum for Mother's Day this year, and for anyone who knows my lovely mum, she adores big accessories, including handbags. So I decided to try my hand at making her a bag this year and it was surprisingly easier than I thought.  I didn't even use a pattern!  I saw a picture of the bag I wanted to create and with my little knowledge of sewing, went for it!
This is how it turned out.


To make a ruffle bag you will need:

~ 1 yard of outter material
~ 1 yard of lining (I used duck cloth material so it was more study, but any fabric will work!)
~ 2 bag handles (I got mine from JoAnnes)
~ 1 Magnetic bag clip (I used a clip on one, but sew on works just as well)
~ Scissors
~ Matching thread
~ Sewing machine

Instructions

I used the instructions from here and tweaked them a little....but it gives you the idea!

http://lamaisonreid.blogspot.com/2010/08/burlap-purse-with-shabby-rose.html

02 March 2012

Tick-Tack-Toe


As I am pretty sure that most of my Senior Primary know most of the songs for our Primary presentation, I decided to see how much they know and what I need to help them with.  So this week we are playing tick-tack-toe.  Behind each number is a question about the different songs in the presentation. I will split the primary into 2 teams.  A team gets to pick a number, and you read the question on the card to them.  When they get it right they sing the song and get to replace the number with the X or O.  If they get the question wrong then the other team have a chance to answer it.  I'll let you know how much they enjoy it when  I've done it ~ although games generally go down pretty well....so we'll see.

Stand for the Right

This month for Primary we should be learning a new song for our presentation, but the Primary already know the song, as it was a song from lasts years presentation.  So I decided to do a review for the Junior Primary.  I printed out pictures and some words of the song, cut and laminated them.  I am going to ask them if they can put the words in order.  Simple, but I thought it would also help the new sunbeams that don't know the song.

Burp Cloths


I decided to make these cute burp cloths for the baby.  I was excited because I knew that it would be an easy quick sewing project and since sewing is what I seem to want to do lately, I thought it would be perfect.  I even included Noah, he chose the 4 pieces of material...he was really excited to do so, hence we have Superman, Mickey Mouse, Trains and then one with Giraffe's on.  I did one side flannel and the other side terry cloth.


To make these super cute burp cloths you will need

~ 27" x 10" Flannel cloth (if you're making these for a little girl there are endless of great choices of material.)
~ 27" x 10" Terry Cloth (any colour)
~ Matching thread
~ Pins
~ Iron and Ironing Board
~ Sewing Machine ;)

Instructions

~ Pin together the terry cloth and flannel, right sides together
~ Sew all the way round, leaving a 4"/5" gap
~ Pull the material right side up
~ Iron
~ Hand or machine sew gap together (I used the sewing machine, it was quicker!)
~ Sew a 2" seam around the burp cloth to finish (optional, but I think it completes them!)

Done!

Blue & Gold Banquet - Survivor

It's now time to catch up on my blogging.  These past 2 weeks have been really busy for me and what with Matthias being away and just getting back yesterday, things are practically back to normal!  So what have I been up to you may ask....well for those of you who don't know Matthias is the Cubmaster for our ward and this Tuesday just gone was our Blue & Gold Banquet.  Unfortunately Matthias did miss it, because work had him out of town, but I went up in his absence instead.  I always love working on big projects and so was grateful that I could help out with this one too.
As this months theme was Resourcefulness Matthias decided to go with a survivor theme.  That's when I set off getting creative....

Our invites were in empty water bottles (like a message in a bottle!) The boys thought they awesome!  We even made the paper look old!

Here are some photographs of the evening and the decorations.  If you would like more information on what we did just contact me!


My awesome cake I made and then left at home!  Yes, pregnancy brain strikes again!

18 February 2012

Baby Shower Gift

There seems to be a huge baby boom this year and I've found myself in the situation of having 17 friends who are having babies within these next 4 months.  I know crazy right?!  But hey, I'm one of them too, so here's to beautiful 2012 babies!

Anyway, I have been trying to think of cute ideas for gifts for them and this is one I came up with.  No they are not cupcakes.....(although I'm sure most of us pregnant ladies wouldn't say no to a cupcake! Well, I wouldn't!) Let me show you what's inside:


Isn't it just so cute!!  They are really easy to make too.


To make a baby shower cupcake gift you will need

~ 4 onesies (any colour you like)
~ 2/4 headbands, flowers or cute little shoes!
~ Ribbon
~ 1 Cup cake box
~ 4 Cup cake baking cups

Instructions

~ Open your onesies and fold in half
~ Lay the headband in the middle of the onesie (making sure the flower is at the top) and roll up
~ Secure with ribbon
~ Put in cup cake baking cup and then into box
~ Repeat till box is full

Its seriously that easy and that cute too!  I love it. 

17 February 2012

Nursing Cover


If feel like I have been sewing like mad these past few weeks, what with making my car seat canopy, diaper/wipes holder and the Captain CTR cape....now I'm adding on my nursing cover!  I'm really pleased with how it turned out.  I know, I didn't make it to match the car seat canopy, but I needed material that was a little thicker and a lighter colour too.  So I decided to stick with green and do something that I can use with a girl or a boy.

I actually used this website for the tutorial as my guide: http://www.thesoutherninstitute.com/2010/06/nursing-cover-tutorial.html

However, I did do my own additions like a backing and the edging on the front of my cover.  Which I have to admit, I just made up on the spot, so I really don't have instructions as such. But I can give you a rough guide below the pictures. (As I think the cover actually looks pretty with these additions, but the other way works just fine and you're right who would actually know that there is a backing to the cover apart from you and your baby!)


Additional things you will need for Backing and Front Edging

~ 1/4 yard of material (this can also be used for the strap if you wish)
~ 3/4 yard of backing material

Instructions for Front Edging

~ Cut the front material 18" x 33" (instead on 28" x 38")
~ Cut side edging 5" x 28"
~ Cut bottom edging 38" x 5"
~ Sew them all together

Instructions for Backing

~ At the top of the front material sew your boning (the wrong way round)
~ Fold over the top material again and pin it down with the backing material (right sides together)
~ Make sure you attach the straps in the middle of you material too (as shown on the directions on the website)
~ Once everything is pinned, sew together and iron

I hope these steps make sense?  I understand them, but some may not, so please contact me if you need.

16 February 2012

Edible Arrangement

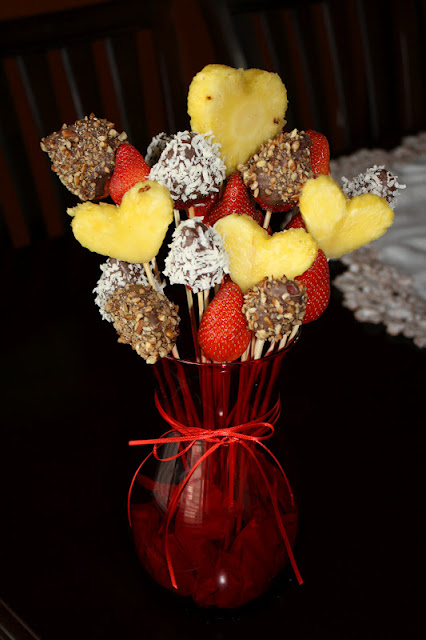
I've always wanted to give an edible arrangement a go and so I thought that Valentines Day was the perfect opportunity!  Mine didn't turn out too bad, but if you would like it to look more professional I would suggest, more fruit and a non-clear vase.  (I'm sure there are other things to make it look better too, but my imagination doesn't stretch that far these days...I am almost 9 months pregnant after all! :))


I kept mine simple and only did strawberries and pineapple, but you can do any fruit you like!  Mango, kiwi, banana, melon, let your imagination go wild.

To make an edible arrangement you will need:

~ Fruit of your choice
~ Skewer sticks
~ Heart shape cookie cutter
~ Vase
~ Chocolate (optional)
~ Nuts, coconut (optional)
~ String
~  Decorative ribbon or anything else you would like

Instructions

~ Wash your fruit
~ Make your heart shaped fruit, but cutting pineapple slices and then use cookie cutter to make the shape
~ Put fruit on your skewers
~ Dip some of your fruit in chocolate and then the nuts or coconut
~ Let chocolate dry
~ Arrange fruit in vase working from the centre outwards (pretty much like when you arrange flowers!)
~ Decorate vase with ribbon or put a label on etc....

Done!  Have fun making your own creations.... :)

14 February 2012

CTR Magnets


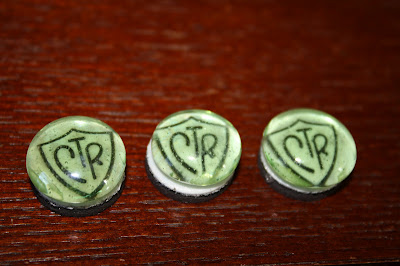
So last week I found myself with a little spare time.  So instead of resting and maybe even taking a nap, I decided to 'cutiefy' my Primary magnets.  Yes I know its above and beyond and really didn't need doing, but I wanted to and could, so I did! :)  This is how I made them.

To make cute Primary CTR magnets you will need:

~ Magnets
~ Green glass gems
~ Mini CTR shields printed from your computer
~ Elmer's Glue

Instructions

~ Cut our your mini CTR shields
~ Glue the CTR shields to the magnets and wait for them to dry a little
~ Glue the Green glass gems to the CTR shields and magnets
~ Let dry and viola! Cute huh?!

Battleships

Every last Sunday of the month I come up with a game to play with the Primary children to play.  I make sure that I pick songs that are fun or that we need to review.

The children just love playing battleships.  I play it them against me.  I have a master sheet where I've 'hid' my ships.  The children take it in turns to guess which square my ship and hid in and when they hit my ship they have to sing the song which is in that square.  Pretty simple, but fun!

My sheet
The battleship board
 Yes you do have to cut out 36 (or less) white circles and however many red circles you want for your ships. I did 12.  Have fun!

Super Singers

Each week in Primary I pick a girl and boy for my Super Singers.  I give them each a badge and a lollipop.  They love it and it encourages them to sing well too. 


So I don't pick the same person twice (as there are 148 children) I have to write their names down each week.

Mailbox


For Primary this week I made a Primary mailbox with notes in for the children.  I did something slightly different for the Junior Primary as I did the Senior Primary.


Inside the envelopes were these little hearts.  This is what I did for Junior and Senior Primary:

Junior Primary

I did the song: If your happy and you know it, but with different words.  As we were learning Choose the Right song, I thought I would have a break from that song and do these words to go with the theme:

To show I Choose the Right, I.....(go to church, say my prayers, read the scriptures....)
To show I Choose the Right, I.....
I know the Saviours way
And it shows in what I say.
To show I Choose the Right, I....

On each of the hearts it finished off the sentence to the song.

As you may see from the picture above the words were covered up by gold paint and the children had to scratch it off, like I scratch card.  I will give instructions below how to make the scratch off paint.

Senior Primary

As the Senior Primary know a lot more songs, I kept it very simple and put different 'love' songs on each heart.

They too had to scratch off the paint to find out what song they were doing to sing.  The scratch paint went down really well.

How to make scratch off Paint you need:

~ Dishwasher liquid
~ Small bowl
~ Paint (in the colour you want)
~ Paint brush
~ Clear sticky back plastic

Instructions

~ 1 tbsp of dishwasher liquid
~ 2 tbsp of paint
~ Mix together
~ Cover the words you want to be hidden with the clear sticky back plastic
~ Paint over the clear sticky back plastic
~ Leave to dry and coat again if needed

Note: If you want larger amounts just make sure you use a 1 to 2 ratio (eg. 1 cup dishwasher liquid to 2 cups paint.)

13 February 2012

Captain CTR

This month for Primary we have been learning the song Choose the Right.  To introduce the song I got my lovely husband to come into Primary as Captain CTR (I was so excited for this!).  He spoke briefly about what it meant to Choose the Right and then he handed out little CTR shields on a stick for each Primary child.  (Yes I did make 150 of them....crazy but worth it!)  Every time the children sung Choose the Right they held up their shields.  It is a great sight and it really helps involve those new Sunbeams!