CLICK HERE FOR FREE BLOGGER TEMPLATES, LINK BUTTONS AND MORE! »

18 February 2012

Baby Shower Gift

There seems to be a huge baby boom this year and I've found myself in the situation of having 17 friends who are having babies within these next 4 months.  I know crazy right?!  But hey, I'm one of them too, so here's to beautiful 2012 babies!

Anyway, I have been trying to think of cute ideas for gifts for them and this is one I came up with.  No they are not cupcakes.....(although I'm sure most of us pregnant ladies wouldn't say no to a cupcake! Well, I wouldn't!) Let me show you what's inside:


Isn't it just so cute!!  They are really easy to make too.


To make a baby shower cupcake gift you will need

~ 4 onesies (any colour you like)
~ 2/4 headbands, flowers or cute little shoes!
~ Ribbon
~ 1 Cup cake box
~ 4 Cup cake baking cups

Instructions

~ Open your onesies and fold in half
~ Lay the headband in the middle of the onesie (making sure the flower is at the top) and roll up
~ Secure with ribbon
~ Put in cup cake baking cup and then into box
~ Repeat till box is full

Its seriously that easy and that cute too!  I love it. 

17 February 2012

Nursing Cover


If feel like I have been sewing like mad these past few weeks, what with making my car seat canopy, diaper/wipes holder and the Captain CTR cape....now I'm adding on my nursing cover!  I'm really pleased with how it turned out.  I know, I didn't make it to match the car seat canopy, but I needed material that was a little thicker and a lighter colour too.  So I decided to stick with green and do something that I can use with a girl or a boy.

I actually used this website for the tutorial as my guide: http://www.thesoutherninstitute.com/2010/06/nursing-cover-tutorial.html

However, I did do my own additions like a backing and the edging on the front of my cover.  Which I have to admit, I just made up on the spot, so I really don't have instructions as such. But I can give you a rough guide below the pictures. (As I think the cover actually looks pretty with these additions, but the other way works just fine and you're right who would actually know that there is a backing to the cover apart from you and your baby!)


Additional things you will need for Backing and Front Edging

~ 1/4 yard of material (this can also be used for the strap if you wish)
~ 3/4 yard of backing material

Instructions for Front Edging

~ Cut the front material 18" x 33" (instead on 28" x 38")
~ Cut side edging 5" x 28"
~ Cut bottom edging 38" x 5"
~ Sew them all together

Instructions for Backing

~ At the top of the front material sew your boning (the wrong way round)
~ Fold over the top material again and pin it down with the backing material (right sides together)
~ Make sure you attach the straps in the middle of you material too (as shown on the directions on the website)
~ Once everything is pinned, sew together and iron

I hope these steps make sense?  I understand them, but some may not, so please contact me if you need.

16 February 2012

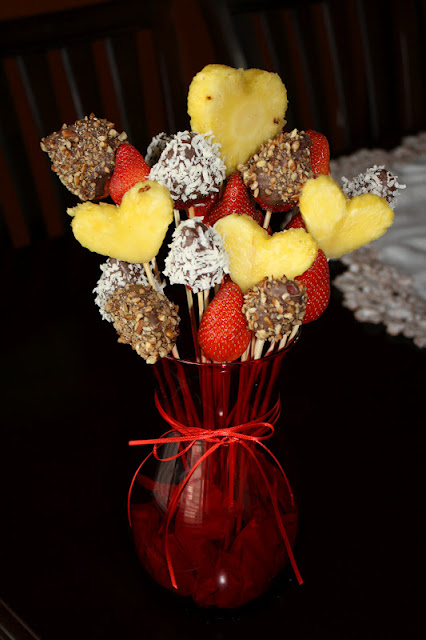
Edible Arrangement

I've always wanted to give an edible arrangement a go and so I thought that Valentines Day was the perfect opportunity!  Mine didn't turn out too bad, but if you would like it to look more professional I would suggest, more fruit and a non-clear vase.  (I'm sure there are other things to make it look better too, but my imagination doesn't stretch that far these days...I am almost 9 months pregnant after all! :))


I kept mine simple and only did strawberries and pineapple, but you can do any fruit you like!  Mango, kiwi, banana, melon, let your imagination go wild.

To make an edible arrangement you will need:

~ Fruit of your choice
~ Skewer sticks
~ Heart shape cookie cutter
~ Vase
~ Chocolate (optional)
~ Nuts, coconut (optional)
~ String
~  Decorative ribbon or anything else you would like

Instructions

~ Wash your fruit
~ Make your heart shaped fruit, but cutting pineapple slices and then use cookie cutter to make the shape
~ Put fruit on your skewers
~ Dip some of your fruit in chocolate and then the nuts or coconut
~ Let chocolate dry
~ Arrange fruit in vase working from the centre outwards (pretty much like when you arrange flowers!)
~ Decorate vase with ribbon or put a label on etc....

Done!  Have fun making your own creations.... :)

14 February 2012

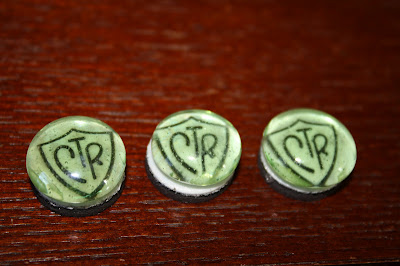
CTR Magnets


So last week I found myself with a little spare time.  So instead of resting and maybe even taking a nap, I decided to 'cutiefy' my Primary magnets.  Yes I know its above and beyond and really didn't need doing, but I wanted to and could, so I did! :)  This is how I made them.

To make cute Primary CTR magnets you will need:

~ Magnets
~ Green glass gems
~ Mini CTR shields printed from your computer
~ Elmer's Glue

Instructions

~ Cut our your mini CTR shields
~ Glue the CTR shields to the magnets and wait for them to dry a little
~ Glue the Green glass gems to the CTR shields and magnets
~ Let dry and viola! Cute huh?!

Battleships

Every last Sunday of the month I come up with a game to play with the Primary children to play.  I make sure that I pick songs that are fun or that we need to review.

The children just love playing battleships.  I play it them against me.  I have a master sheet where I've 'hid' my ships.  The children take it in turns to guess which square my ship and hid in and when they hit my ship they have to sing the song which is in that square.  Pretty simple, but fun!

My sheet
The battleship board
 Yes you do have to cut out 36 (or less) white circles and however many red circles you want for your ships. I did 12.  Have fun!

Super Singers

Each week in Primary I pick a girl and boy for my Super Singers.  I give them each a badge and a lollipop.  They love it and it encourages them to sing well too. 


So I don't pick the same person twice (as there are 148 children) I have to write their names down each week.

Mailbox


For Primary this week I made a Primary mailbox with notes in for the children.  I did something slightly different for the Junior Primary as I did the Senior Primary.


Inside the envelopes were these little hearts.  This is what I did for Junior and Senior Primary:

Junior Primary

I did the song: If your happy and you know it, but with different words.  As we were learning Choose the Right song, I thought I would have a break from that song and do these words to go with the theme:

To show I Choose the Right, I.....(go to church, say my prayers, read the scriptures....)
To show I Choose the Right, I.....
I know the Saviours way
And it shows in what I say.
To show I Choose the Right, I....

On each of the hearts it finished off the sentence to the song.

As you may see from the picture above the words were covered up by gold paint and the children had to scratch it off, like I scratch card.  I will give instructions below how to make the scratch off paint.

Senior Primary

As the Senior Primary know a lot more songs, I kept it very simple and put different 'love' songs on each heart.

They too had to scratch off the paint to find out what song they were doing to sing.  The scratch paint went down really well.

How to make scratch off Paint you need:

~ Dishwasher liquid
~ Small bowl
~ Paint (in the colour you want)
~ Paint brush
~ Clear sticky back plastic

Instructions

~ 1 tbsp of dishwasher liquid
~ 2 tbsp of paint
~ Mix together
~ Cover the words you want to be hidden with the clear sticky back plastic
~ Paint over the clear sticky back plastic
~ Leave to dry and coat again if needed

Note: If you want larger amounts just make sure you use a 1 to 2 ratio (eg. 1 cup dishwasher liquid to 2 cups paint.)

13 February 2012

Captain CTR

This month for Primary we have been learning the song Choose the Right.  To introduce the song I got my lovely husband to come into Primary as Captain CTR (I was so excited for this!).  He spoke briefly about what it meant to Choose the Right and then he handed out little CTR shields on a stick for each Primary child.  (Yes I did make 150 of them....crazy but worth it!)  Every time the children sung Choose the Right they held up their shields.  It is a great sight and it really helps involve those new Sunbeams!


Crayon Hearts


I love Valentines day...and the crafts are endless.  I promise you this is the last one we did, for this year anyway!

So how to turn this:


Into this:


Using this:


Simple

To make your crayon hearts you will need:

~ Old or cheap crayons (I got 96 crayons for $2 from dollar tree!)
~ Silicon heart shape cake tin
~ Oven :)

Instructions

~ Pre-heat oven to 250 F
~ Take off crayon wrappers (paper)
~ Break up crayon
~ Put in silicon cake tin
~ Put cake tin on cookie sheet and bake crayons for 20 to 30 minutes
~ Take out and leave to stand and harden for 10 to 20 minutes

They come out great!  You can do all different shapes and not just for Valentines either...Christmas, Thanksgiving, Birthday favours....let your imagination go wild!

Valentine Hearts


These Valentine hearts were fun to do and even good for 2 year olds! 

To make the Valentine Hearts you will need:

~ Pink or Red card stock
~ Clear sticky back plastic
~ Stars, hearts, words, pictures of things you love for decorating
~ Scissors

Instructions

~ Cut a heart shape out of your card stock
~ Cut another heart out of the heart
~ Place your hollow heart on your sticky back plastic and cut around it
~ Let the children decorate the middle with whatever they like.
~ Cut another small heart from the sticky back plastic
~ To secure the decorations, stick the sticky back plastic over the clear section of the heart

Super cute and super easy.  These could be made into mobiles for decoration, valentine gift cards for friends or family, window decorations or anything you like!

Valentine Butterflies

Being as Valentines Day is tomorrow, Noah and I have been enjoying making some valentine creations.  Here are the cutest valentine butterflies we made.


Admittedly Noah was more interested in eating the lollipops, but he did colour some in!  The website I got the template from suggested that you put googly eyes on the lollipops, but Noah had already pulled the ones off of this butterfly so he could eat it!!

Anyhow,....

To make the Valentine Butterflies you will need

~ Coloured card stock
~ Lollipops of your choice
~ Scissors
~ Hearts, colours and glitter for decorating

Instructions

~ Print the butterflies from this template http://www.skiptomylou.org/2009/02/03/printable-valentines/ onto your card stock
~ Cut out butterflies and slots for the lollipops
~ Decorate
~ Insert lollipops

Thanks skiptomylou.org for the cute valentine idea and template!

Diaper/Wipes Holder

For those of you who know me I like to be coordinated, with pretty much everything!  So I took on another much quicker sewing project this time.  A diaper/wipes holder to go in my bag, so I don't have to take out the whole big diaper bag all the time!  Isn't it cute!! :) And seriously people, it was so stinking easy, I thought I had done it wrong!  But it turns out I didn't!


I have to admit I didn't measure anything and I just used a video guide from youtube to make it.  It too all of 5 minutes!  Honestly!!  I can write the basics you will  need then I will add the link to the video.

To make a diaper/wipes holder you will need:

~ 1/4 yard of back material
~ 1/4 yard of front material
~ Sew on Velcro
~ Basics: scissors, cotton and sewing machine!

Instructions

Here is the website I used.  http://www.youtube.com/watch?v=cdf0QwGIRNM

If anyone would like a template, just email me and I can send you the one I used.

Infant Car Seat Canopy

As most of you know, we are expecting baby #2 in 5 or so weeks.  We are extremely excited and can't wait for his arrival.  So in preparation I have been sewing a few new things for him.  One being a Infant Car Seat Canopy.  Unfortunately my pictures aren't the best as I haven't got my car seat as yet, (its being shipped) and so you can't see the full genius of my sewing creation! ;)  But I'm sure you get the gist or it.


Once I have my car seat I will take new pictures and post them!

To make an infant car seat canopy you will need:

~ 1 yard front fabric
~ 1 yard back fabric
~ 4” sew-on Velcro (don't get the adhesive kind)
~ Any coordinating fabric, ribbon, etc. to embellish as desired (not necessary) I used 10 feet of rick rack.
~ A medium bowl from your kitchen (about 7-10" diameter)
~ Basics like thread, scissors, pencil, ruler, iron, pins, and of course a sewing machine :)

Instructions

~ Cut your back and front fabric into 35" wide x 41" tall. (Save the scraps for later.)
~ Round your corners using your medium bowl as your guide
~ If you're using rick rack cut 10 feet
~ Get your front and back material and place right sides (pattern sides) together, carefully placing the rick rack in the middle
~ Pin material and rick rack together, making sure that you're rick rack will be sown down the middle
~ Sew together leaving a 4/5 inch gap so you can pull the material through
~ Iron
~ Sew gap up with machine or if you prefer by hand
~ Cut two strips 5” wide x 8.5” tall out of your outer fabric for the straps
~ Take each strip and fold it in half, right sides together along the long edge.
~ Sew along the long edge and one short edge with a ½” seam
~ Turn right side out
~ Iron
~ Cut 2" Velcro pieces
~ Sew to the endsof each strap. Sew the rough piece of Velcro to one side and the soft piece of Velcro to the opposite side of each strap
~ Find the middle of your fabric and mark two lines 6 inches apart (3" from the centre!)
~ Sew you're straps on
~ Ta-da! Now you have one infant car seat canopy.

Song Tree


Another simple idea I used in Autumn was this song tree.  Of ever we had some spare time (very rarely does that happen! But every 4th Sunday I had the whole of Primary time, so sometimes it would!) I would pull out my song tree with all fun songs that the Primary love to sing.

To make the song tree you will need:

~ Green, orange, yellow & brown card stock
~ Laminating Pouches
~ Big piece of white card
~ Song names
~ Tape
~ Blue Tac

Instructions

~ Cut out leaves
~ Laminate them and cut out again!
~ Add song names to one side
~ Draw and cut out the tree shape
~ Stick to white card
~ blue tac the leaves to the tree

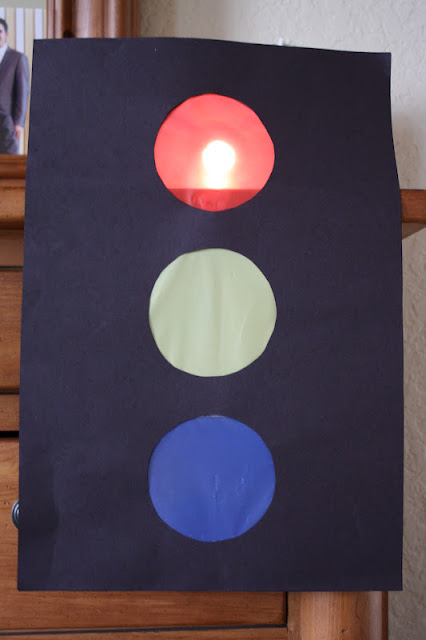
Traffic Light

To my surprise when I was called into Primary, not many of the children actually knew the song Our Primary Colours!  So I made some fun word sticks and this Primary Traffic Light.  Since it was for Primary I decided to change the green light to blue.  Every time the Red Light shone the primary children didn't sing, the orange light they hummed and the blue light they sang loud.   It helped them learn the words of the song and they had fun too.  Double bonus!


To make the Primary traffic light you will need:

~ 2 pieces of large black card stock
~ Red, blue & yellow gift bags or coloured plastic sheets
~ Tape or Glue

Instructions

~ Cut out the 3 circles in both pieces of black card stock, starting with the middle one first to keep everything symmetrical.
~ Tape or glue the coloured paper to one of the pieces of card stock
~ Glue together both card stocks
~ And you're done!

Nice and simple I know...they're the type of craft projects I like!

Rhythm Box


I know that this isn't super exciting, but going along with the rhythm theme, my Primary children just love playing instruments to the songs.  So I made them a rhythm box full of tamborines, shakers, bells, cymballs, triangles, rhythm sticks and more.  It makes a simple, but fun singing time!

Conducting Elephant

So this isn't an original idea and I have still to put a trunk on my Eddie Elephant, but I thought I would share the idea again.

I use this elephant for my Primary music calling to teach the children about conducting.  So far they have all learnt how to conduct a 2/2 and 3/4 beat.  I have 148 in my primary and so not everyone gets a turn to conduct with Eddie, but they still love to see others do it too. (It even goes down well with Senior Primary!)


To make Eddie Elephant you will need:

~ White Card or foam board
~ Grey & Pink acrylic paint
~ Black Marker
~ Sharp knife (for cutting out the whole)
~ Grey sock or felt material
~ Hot Glue Gun

Instructions

~ First draw your elephant. Some people have opted for just the head, but I prefer the whole body.
~ Paint
~ Outline with black marker
~ Cut a 4/5 inch whole where the trunk would be
~ Get a sock (if you are using a piece of felt you will need to sew the 2 sides together before gluing it to the card.  I prefer the sock!) and hot glue the edge of the sock to the back side of the elephant. You will need a lot of glue so it doesn't come off.
~ And voila....you have a conducting elephant!

Welcome!

Projects, projects, projects......that is all that seems to be on my list of things to do lately ~ whether its crafts, sewing projects for baby #2, things for my Primary calling or just fun things for Noah and I to do, I have at least one project a week!!  So I decided to record everything that I have done and put it into a blog!  I like blogging, so I thought that I would give a 3rd blog a try. :)

I hope you enjoy reading 'The Things I Do' and maybe, who knows, it may give you a few ideas of your own to add to your things to do list. 

Thanks for reading!!
~ Elle